Like what you see? Please share with your friends and the whole world...


 Part of living a more sustainable life means making more things at home. We were in need of a new dining table so the perfect solution was a pallet dining room table. We have always enjoyed the rustic style furnishings and so so this was a perfect solution.
 Edited to add: Before beginning any pallet project, and especially those with surfaces food will come in contact with, ensure that the pallets you are using are stamped with an HT. This indicates that the pallet was heat treated, not chemically. Also, try to determine any uses for the pallet that you can. Just because it was heat treated doesn’t mean that it didn’t have chemicals sprayed on it, loaded on it, or in contact with it. To read more about working with pallets, check out my article Building with Pallets for tips on breaking them down and more.
Using 3 wood pallets, I tore them apart one piece at a time, salvaging as much wood as I possibly could. I even salvaged as many nails as I could so that I could use them in making the table to give me the rusted, weathered nail look. I wish I had “in-progress” pictures, but I do not. I used the frame portions of the pallets to make my table top frame. Because I wanted to go longer than the pallet length, I added the extra length and sistered a board onto the backside of each of the boards. I planed the edges of each of the boards to get a nice straight edge for gluing. I decided on the order I wanted the boards (to give me the most diversity in color and texture) and then biscuit joined and glued every board upside down.

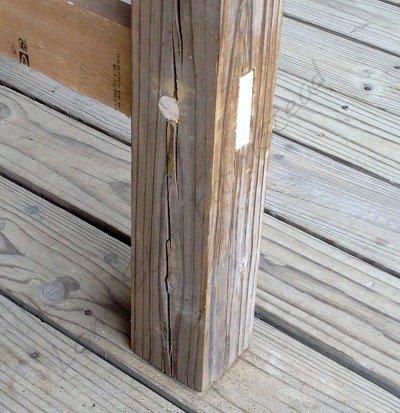
I let it sit for 24 hours and then came back and glued the frame to the bottom of the table top. I flipped the whole thing over while glued and clamped and then nailed every board to the frame. For the leg system, I used salvaged 4″ x 4″ posts and a 2″ x 4″. I used hand cut mortise and tenon joints to join the legs together, then drilled a hole and used wooden dowels for the pegs through the tenons.
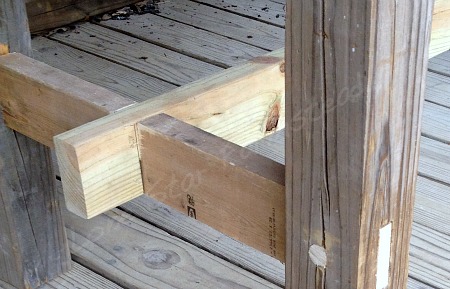
As you can see, the middle runner on the leg system utilizes a lap joint with no glue or mechanical fastener. I made a snug joint and left it as is to allow for expansion and contraction. I then used some simple bolts and washers to attach the leg system and table top.
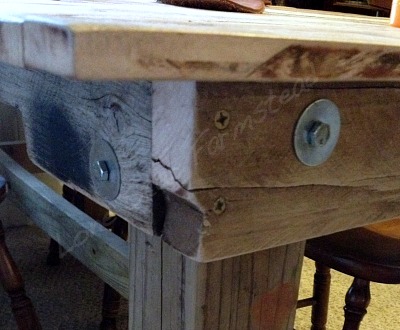
To finish the top I chose to hand plane a few of the joints on the table top that didn’t quite match up due to varying thickness on the different boards. I then did some very minimal sanding with some 150 grit sandpaper to knock down the splinters. I didn’t want to smooth the top and lose all the character. The blade chatter marks, holes, rust marks, stains, and various other marks are what give this its unique look. I also didn’t want a change to the finish that would come with using any polyurethane (even satin changes the look of the wood more than I wanted), so I used teak oil to coat the top and give it a little water resistance. The down side to this finish is that and liquid source will likely stain the wood. Darker liquids would obviously do more damage but the teak oil does buy you a little time to get it wiped up. So far we haven’t had any issues. We do use coasters under our glasses to help protect the table top. Unless you are willing to take the chance of adding more character to the table top, I would highly recommend a polyurethane finish to seal the wood. That just wasn’t a good fit for us. The only thing I would do different would be to plane each piece of the table top to the same thickness. But my jointer/planer knives were shot and barely got me through planing the edges and I didn’t have my thickness planer yet. If I were to use my thickness planer I would only plane the bottom side so as to avoid planing off the character. All total this table cost me about $10. I got the pallets free, had the teak oil on hand from a previous project, and had all the other wood from other salvage jobs. So the only cost to me was the bolts. Hope you enjoy the look of the table and I hope I inspire at least one person to try making their own dining room table. If you have any questions, or need any pointers, please feel free to comment or e-mail me. I would be more than happy to help.
Summary
Article Name
Pallet Dining Room Table
Description
This pallet dining room table cost me $10 to make and has a ton of character. It's not a high dollar piece of furniture but it fits with a rustic decor perfectly and was a fun project to build.
Author
Brandon Sutter
Like what you see? Please share with your friends and the whole world...


